How to Rig a Bobber for Bluegill
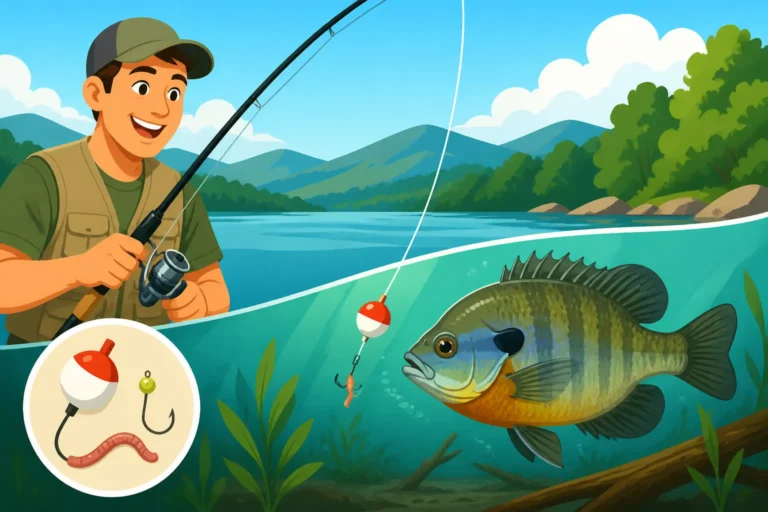
There's nothing quite like the joy of a bobber dancing on the water, signaling a bite, especially when you're targeting bluegill. If you've ever felt overwhelmed by complex fishing setups or just want a simple, effective way to introduce someone to the sport, getting your bobber rig just right for these feisty panfish is your ticket to a fantastic day on the water. This guide will walk you through everything you need to know to assemble the perfect bluegill bobber rig, making your next fishing trip both relaxing and rewarding.
Why the Bobber Rig is Your Bluegill Secret Weapon
Let's face it, sometimes fishing can feel overly complicated. You see seasoned anglers with their fancy electronics and intricate lure presentations, and it can be intimidating. But with bluegill, simplicity is often the key, and that's precisely where the bobber rig shines. It's not just a beginner's tool; it's a fundamental setup that's incredibly effective and visually satisfying, especially when you're teaching kids or just unwinding by a quiet Tennessee pond.
The Magic of Simplicity for Panfish
The beauty of a bobber rig for bluegill lies in its straightforward nature. You don't need to master complex casting techniques or spend hours learning to "read the water" in the same way you might for more elusive species. Instead, you're presenting bait in a very natural, suspended way, right in the feeding zone of bluegill. This simplicity makes it an ideal setup for those new to the sport, helping them build confidence and experience the thrill of a catch without getting bogged down in advanced tactics. It's often the first rig I recommend for anyone looking to try their hand at fishing, a fantastic starting point before diving into more advanced methods for species like bass or trout.
A Visual Feast: The Bobber as a Strike Indicator
One of the biggest frustrations for new anglers, or even experienced ones on a slow day, is the uncertainty of a bite. Is that a fish, or just the current? With a bobber, there's no guesswork. That little floating indicator acts as your eyes in the water, translating subtle tugs and full-on dives into undeniable signals. There's a primal satisfaction that comes from watching a bobber dip, wiggle, and then disappear beneath the surface. It's a clear, unmistakable sign that a bluegill has taken your bait, making the moment of setting the hook incredibly intuitive and exciting. It simplifies the entire process, allowing you to relax and enjoy the scenery until that tell-tale bobber dance begins.
Precision Depth Control for Finicky Eaters
Bluegill, while generally not picky, do have preferred feeding depths depending on water temperature, time of day, and available cover. A bobber rig gives you unparalleled control over how deep your bait is presented. Unlike bottom fishing rigs that rely on weight to keep the bait down, or artificial lures that need constant retrieval, a bobber allows your natural bait to hang enticingly at a precise depth. This is crucial because if the bluegill are suspended a few feet off the bottom, or just under the surface near some lily pads, you can adjust your rig to put your bait exactly where they're feeding. This adaptability, combined with its simplicity, makes the bobber rig incredibly versatile for targeting bluegill in various environments, from shallow ponds to deeper lake coves.
Gathering Your Bluegill Bobber Rig Essentials
Before you can enjoy that satisfying bobber dunk, you need to gather a few basic pieces of gear. The good news is, bluegill fishing doesn't require a huge investment in expensive equipment. In fact, many of these items can be found affordably, and for a complete beginner, sometimes the most basic setup is the best. You can often find great deals on these items through retailers like Amazon, making it easy to get everything you need delivered right to your door.
Rod, Reel, and Line Selection
When it comes to bluegill, you want light tackle. This isn't about overpowering the fish; it's about enjoying the fight, even from a small panfish.
- Rod: A lightweight spinning rod, usually in the 5 to 6-foot range, with a light or ultralight action is perfect. This flexibility allows even small bluegill to put a bend in your rod, making the experience more engaging. For kids, a shorter rod (3-4 feet) is often easier to handle.
- Reel: A small spinning reel (size 500 to 1000) that balances well with your rod is ideal. It should have a smooth drag system, though for bluegill, you won't be testing it much!
- Line: Stick with monofilament fishing line, typically in the 2 to 6-pound test range. Monofilament is forgiving, has a bit of stretch, and is easy for beginners to tie knots with. Anything heavier will be overkill and can hinder casting lighter baits and bobbers. If you're looking for an all-around setup, checking out "Best Fishing Gear for Beginners" can provide more guidance on combo choices.
Hooks, Sinkers, and Swivels
These small but mighty components are crucial for a successful bobber rig. Don't underestimate their importance.
- Hooks: Bluegill have small mouths, so you need small hooks. Size 6, 8, or even 10 Aberdeen or baitholder hooks are excellent choices. Aberdeen hooks are thin-wired, making them easier to remove from a fish's mouth, while baitholder hooks have tiny barbs on the shank to keep live bait from sliding off. You can often find multi-packs on Amazon that include a variety of sizes.
- Sinkers: You'll primarily use split shot sinkers. These are small, round lead (or non-toxic alternative) weights that you pinch onto your line. A few small split shot are usually enough to get your bait down and help your bobber stand upright. Sizes like BB or #7 are generally suitable. The goal isn't to sink your bait quickly, but just to overcome the buoyancy of the bobber and bait.
- Swivels: While not strictly mandatory for a basic bluegill bobber rig, a small barrel swivel (size 10-14) can be helpful, especially if you're using live bait that tends to spin, which can twist your line. It also provides a convenient point to connect your main line to a lighter leader, offering a bit of insurance against line breaks.
The Star of the Show: Bobber Types and Choices
The bobber itself is, of course, central to this setup. There are generally two main types you'll encounter, each with its own advantages.
- Fixed Bobbers: These are the classic red and white plastic bobbers you probably grew up with. They clip directly onto your line at a fixed depth. They're fantastic for shallow water fishing, typically depths of up to 4-5 feet. They're easy to use and highly visible.
- Slip Bobbers: These bobbers have a hole through the center, allowing your fishing line to "slip" through them. You use a bobber stop (a small knot or piece of rubber) on your line above the bobber to set your desired depth. This allows you to fish much deeper water (10, 20 feet, or more) without having a long length of line dangling from your rod tip, which makes casting much easier. If you plan to fish deeper areas of a lake or pond, slip bobbers are indispensable. For a comparison of scenarios, check the table below.
| Feature | Fixed Bobber | Slip Bobber |
|---|---|---|
| Ideal Depth | Shallow water (up to ~5 feet) | Any depth, especially deep water (>5 feet) |
| Ease of Use | Very easy, clips on | Requires a bobber stop, slightly more setup |
| Casting | Can be cumbersome with long leader in deep water | Very easy to cast regardless of depth |
| Sensitivity | Good, but depth can restrict presentation | Excellent, can detect subtle bites at any depth |
| Visibility | High | High |
| Best For | Bank fishing in shallow ponds, beginners | Boat fishing, deeper lake spots, versatile angling |
Bluegill's Favorite Snacks: Bait Choices
Bluegill aren't typically finicky eaters, which is another reason they're so much fun to target. They'll readily strike a variety of baits.
- Live Bait: This is often the most effective.
- Worms: Small pieces of red wiggler worms or nightcrawlers are absolute bluegill magnets. They're easy to find and stay on the hook well.
- Crickets/Grasshoppers: These are fantastic, especially in late spring and summer. The bluegill just can't resist a struggling insect on the surface.
- Minnows: Very small minnows can also entice larger bluegill and even other panfish species like crappie.
- Artificial Bait:
- Small Jigs: Tiny jigs tipped with a small piece of plastic (like a 1-inch grub) can be very effective.
- Corn or Bread: Believe it or not, a kernel of canned corn or a small piece of balled-up bread can sometimes work wonders, especially in highly pressured waters where bluegill might be accustomed to human offerings. For more specific recommendations, take a peek at "Best Bait for Bluegill and Panfish".
Step-by-Step: Assembling Your Perfect Bluegill Bobber Rig
Alright, you've got all your gear laid out. Now let's put it all together. This is where the magic happens, and you'll see just how simple it is to get ready for a day of fun. Whether you're setting up a "Simple Bluegill Rig for Kids" or preparing for a relaxed afternoon by yourself, these steps are universal.
Attaching Your Hook and Sinker
This is the foundation of your rig, getting your bait to the bluegill.
- Tie on your hook: Start by tying your chosen small hook onto the end of your fishing line. The improved clinch knot or palomar knot are excellent, reliable choices that are relatively easy to learn. If you're using a swivel, you'll tie your main line to one end of the swivel, then a short leader (6-12 inches of lighter line) to the other end of the swivel, and then your hook to the leader. This setup helps prevent line twist and can make re-tying a hook quicker if you snag.
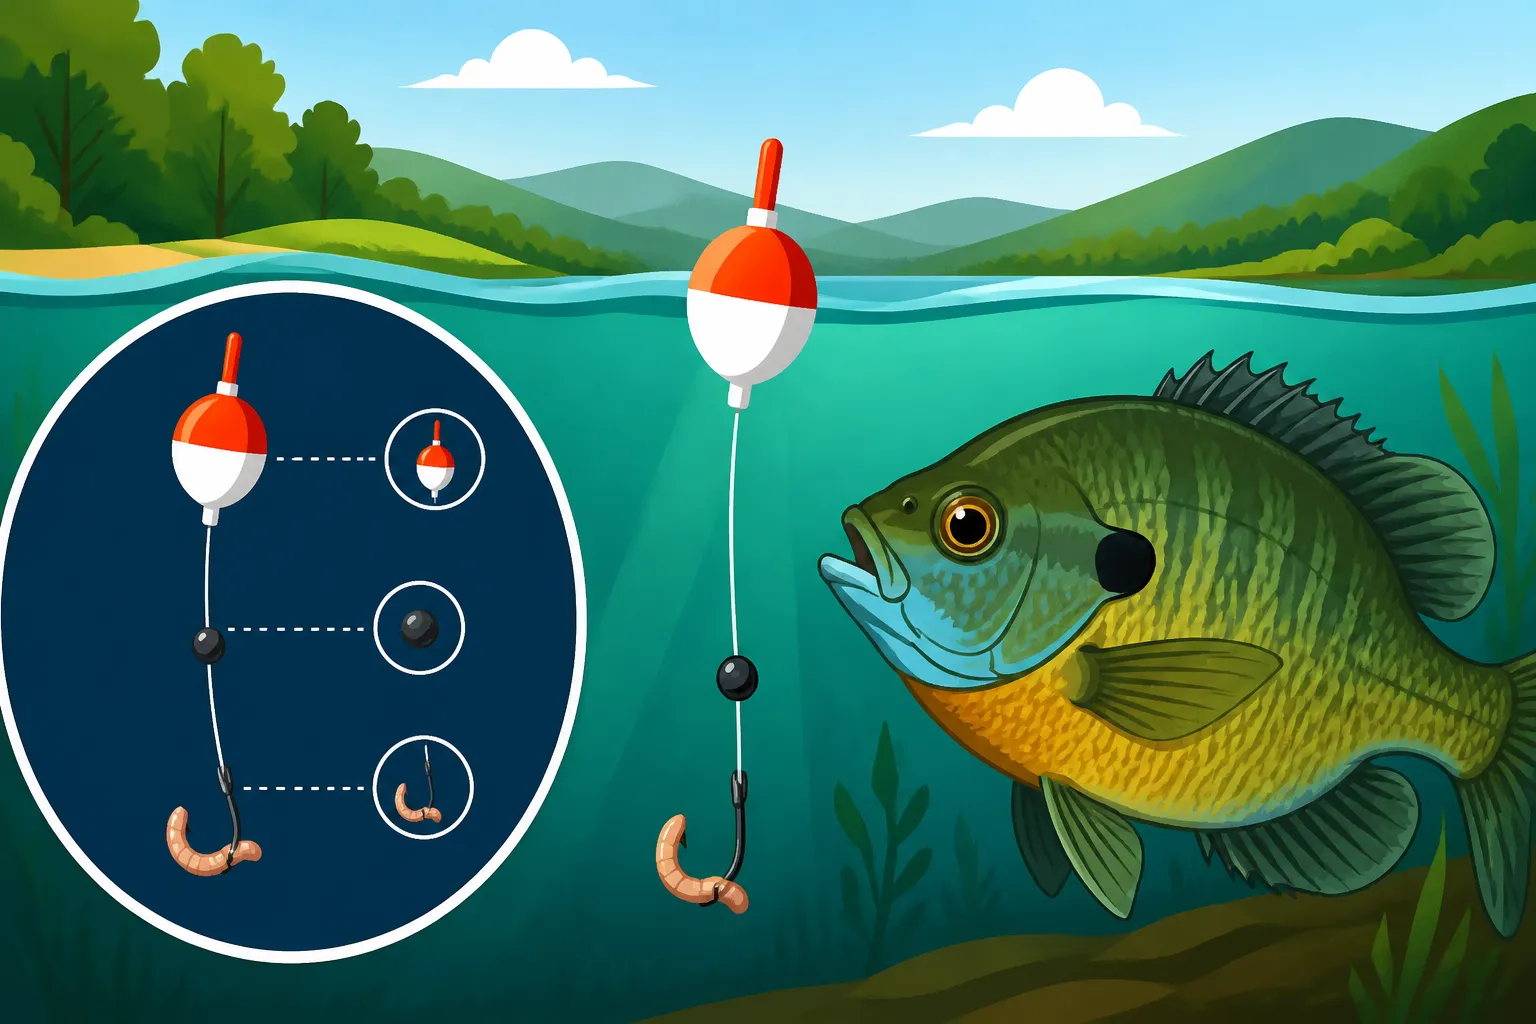
- Add your sinker(s): About 6-12 inches above your hook, pinch one or two small split shot sinkers onto your line. The exact number and size will depend on the weight of your bait and bobber. The goal is to have just enough weight to allow your bait to sink naturally and to make your bobber sit upright in the water without pulling it completely under. Start with one small split shot, and add another if your bobber isn't standing correctly or your bait isn't sinking.
Placing Your Bobber Correctly
This is where you decide how your bobber will function and where your bait will hang.
-
For a Fixed Bobber:
- Open the spring clip at the top of the bobber by pressing down on the button or lever.
- Slide your fishing line into the small hook or slot.
- Close the spring clip.
- Repeat the process for the bottom clip.
- Adjust the bobber up or down your line until it's about 1 to 4 feet above your hook and sinker, depending on the depth you want to fish. Remember, fixed bobbers are best for shallower water.
-
For a Slip Bobber:
- Add your bobber stop: Slide a small bobber stop onto your main line first. These usually come with a small plastic tube; you thread your line through the tube, slide the stop off the tube and onto your line, then pull the tag ends of the stop knot tight. Trim the tag ends, leaving about ¼ inch.
- Thread the bobber: Next, slide your slip bobber onto the line, allowing it to "slip" freely past the bobber stop.
- Add a bead (optional but recommended): A small plastic bead (usually found with bobber stops or in tackle kits) can be threaded onto the line after the bobber. This bead acts as a buffer, preventing the bobber from sliding too far up and getting stuck on your bobber stop knot.
- Connect to your hook/swivel: After the bead, tie on your small barrel swivel. Then, tie a 6-12 inch leader from the other end of the swivel to your hook. If you're not using a swivel, simply tie your hook directly to your main line after the bead. The split shot sinker(s) should be placed on the leader, a few inches above the hook, as described in the previous section.
Setting Your Depth: The Critical Adjustment
This is arguably the most important step for catching bluegill. They school up and often feed at a specific depth.
- Gauge the water depth: If you're new to a spot, you might not know the exact depth. Cast out and let your bait sink without the bobber if you can. Count how long it takes to hit bottom. Or, watch for fish activity. Are they hitting the surface? Or are they deeper?
- Adjust your bobber stop (slip bobber) or reposition your fixed bobber:
- For slip bobbers: Slide your bobber stop knot up or down your main line to increase or decrease the depth. A good starting point is usually 2-3 feet off the bottom, or just above any visible submerged cover. You can slide the bobber stop up your line (away from the hook) to fish deeper, or down your line (closer to the hook) to fish shallower.
- For fixed bobbers: Simply unclip and re-clip the bobber higher or lower on your line.
- Experiment: Bluegill often hang around structure like submerged logs, weed beds, or dock pilings. Start by setting your bait a foot or two above such cover. If you're not getting bites, try adjusting the depth by a foot or so every 10-15 minutes until you find the "strike zone." Sometimes, moving just six inches can make all the difference. Remember, bluegill are often found in "Where to Find Bluegill in Tennessee Ponds" or near submerged structures in larger lakes.
Mastering the Bobber: Tips for More Bluegill Bites
Rigging your bobber is just the first step. To really maximize your catches and enjoy your time on the water, there are a few extra tips and tricks that can turn a good fishing day into a great one. Don't be discouraged if you're not catching fish immediately; sometimes it's about making small adjustments and learning to "read" the water and your bobber.
Casting and Presentation
A gentle touch often yields the best results when targeting bluegill with a bobber.
- Gentle Casts: You're not trying to launch your bait across the entire lake. Bluegill are often found relatively close to the bank or around visible cover. A soft, accurate cast is more effective than a powerful, splashy one. Aim to land your bobber and bait quietly near structure like lily pads, submerged timber, or dock pilings. Too much commotion can spook these smaller fish.
- Let it Sit: Once your bobber and bait are in the water, resist the urge to constantly reel in or twitch your rod. Let the bait settle naturally. Bluegill are curious and will often investigate a still, enticing offering. Sometimes, a very subtle twitch of the rod tip after a few minutes can make the bait "dance" and trigger a strike, but often, patience is key. This passive approach makes it ideal for relaxing days, or when teaching young anglers who might find constant retrieval tiring.
Reading the Bobber and Setting the Hook
This is where the visual appeal of bobber fishing truly shines, but it's important to understand what your bobber is telling you.
- The Nibble: Sometimes, you'll see your bobber twitch or dip just slightly. This often means a bluegill is investigating or lightly mouthing the bait. Resist setting the hook immediately; let them commit.
- The Dip: A more pronounced dip, where the bobber goes sideways or moves under the surface for a moment before reappearing, indicates a more serious bite.
- The Vanish: The most exciting signal! When the bobber completely disappears beneath the surface and stays there, that's your cue.
- Setting the Hook: Once the bobber clearly goes under, give a quick, firm, upward snap of your wrist. You don't need a huge, sweeping motion; a gentle but decisive flick is usually enough to embed the small hook in a bluegill's mouth. Overpowering the hookset can tear the hook out or break your light line. Keep an eye on "How to Catch Bluegill From the Bank" for more practical bank fishing tips.
Common Bobber Rig Mistakes to Avoid
Even with a simple rig, there are a few common missteps that can hinder your success. Being aware of these can save you a lot of frustration.
- Using Too Big a Bobber: A large bobber offers more resistance to a biting fish. A bluegill might feel the drag and let go of the bait. Opt for the smallest bobber that will still support your bait and split shot while remaining visible.
- Using Too Much Weight: Similarly, too many split shots can make your bait sink unnaturally and also telegraph too much resistance to a bluegill. Just enough weight to keep your bait down and your bobber upright is all you need.
- Wrong Depth: As discussed, bluegill often school at specific depths. If you're not getting bites, don't be afraid to adjust your depth settings. Try moving your bobber a foot shallower or deeper every 10-15 minutes until you find where the fish are holding.
- Impatience: Bluegill fishing is often about patience and observation. Don't constantly reel in and re-cast unless you're confident you're in a completely barren spot. Give the fish time to find your bait.
Finding the Right Spot for Bluegill
Even the perfect rig needs to be in the right place to be effective. Luckily, bluegill are quite predictable.
- Shallow Water Cover: Look for areas with submerged vegetation, lily pads, fallen trees, brush piles, or docks. Bluegill love to hide in and around these structures for protection from predators and as ambush points for insects.
- Bank Access: Many excellent bluegill spots are accessible from the bank. Ponds, slow-moving creeks, and coves in larger lakes are prime locations. You might find "Easy Bank-Access Ponds for a First Fishing Trip Near Knoxville" or "Family-Friendly Fishing at Percy Priest Lake, Tennessee" to be great starting points.
- Time of Day: While bluegill can be caught all day, they're often most active during the cooler parts of the day – early mornings and late afternoons/evenings. During midday heat, they might retreat to deeper water or denser cover. This aligns with findings in "Best Time of Day to Catch Bream."
By keeping these tips in mind, you'll not only rig your bobber correctly but also fish it effectively, leading to more memorable catches and a deeper appreciation for the simple, joyful pursuit of Tennessee bluegill.
Disclaimer
This article is for general informational purposes only and does not constitute professional advice. Laws, prices and regulations vary by location and change over time. Consult a qualified professional for guidance on your specific situation.