How to Rig a Jig for Bass Fishing
Many an angler has stared into their tackle box, a handful of jigs rattling around, and wondered if they're really using them to their full potential. It's a common frustration, especially with bass jigs, because they aren't just "tie it on and cast." The truth is, how you rig that jig, from the trailer you choose to how you present it, makes all the difference between a frustrating day on the water and landing that lunker you've been dreaming of. This guide is all about demystifying the art of rigging bass jigs, giving you the practical know-how to make every cast count.
The Versatile World of Bass Jigs
Bass jigs are, without a doubt, one of the most productive and versatile lures in a serious angler's arsenal. They imitate a wide array of forage – from crawfish scuttling along the bottom to baitfish swimming through cover, and even bluegill foraging in shallow water. But their effectiveness isn't just about their shape; it's about how you dress them and how you work them. It’s like a chef having a fantastic cut of meat – the cooking method and seasonings are what truly elevate it.
Understanding the Components of a Bass Jig
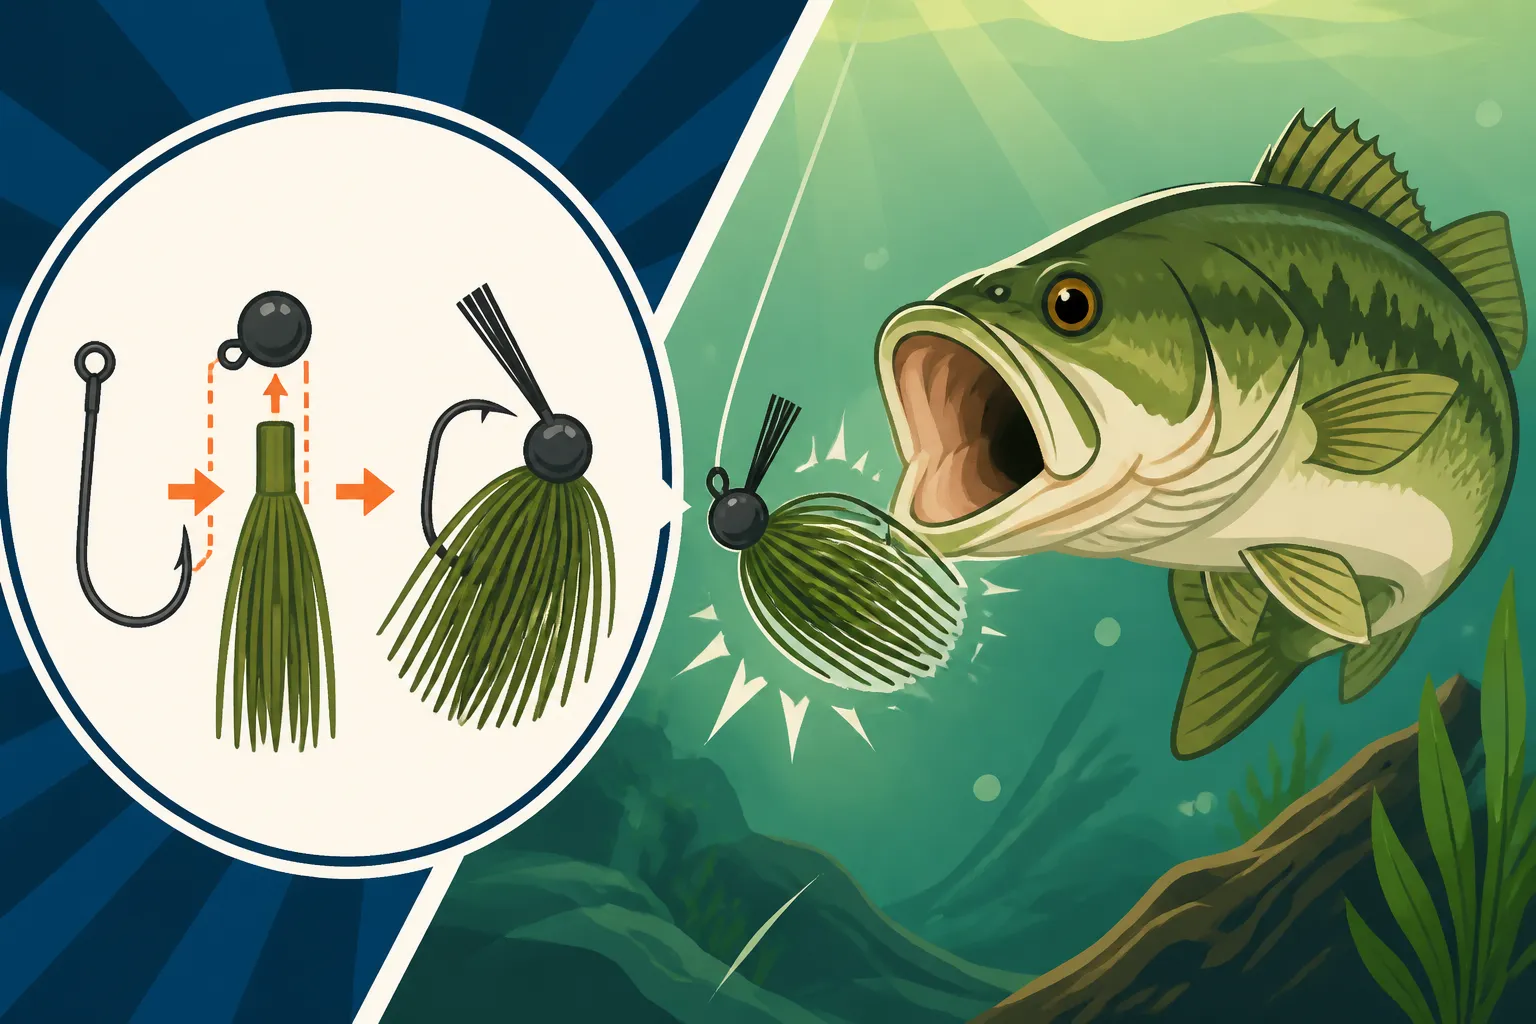
Before we dive into rigging, let's quickly break down what makes up a bass jig. It's more than just a lead head with a hook. Each component plays a vital role in its action, profile, and effectiveness.
- The Jig Head: This is the weighted part, typically lead, that gives the jig its sinking action and helps it navigate cover. Jig heads come in various shapes and weights, each designed for a specific purpose. For instance, a football-shaped head excels on rocky bottoms, allowing it to "walk" over snags, while a pointed head with a weed guard is perfect for punching through thick vegetation. The weight dictates how fast it falls and how deep it can be fished.
- The Hook: This might seem obvious, but jig hooks are crucial. They're usually stout and sharp, designed to handle the powerful jaw of a bass. The size and gap of the hook need to be matched with the jig's head and the size of your chosen trailer to ensure optimal hook-sets. A good, sharp hook is paramount; it’s often the first thing I upgrade on a new jig if it feels a little dull right out of the package.
- The Skirt: This is the "flash and flare" of the jig, usually made of silicone or natural hair (like deer hair). The skirt creates a pulsating, lifelike action in the water, mimicking the legs of a crawfish or the fins of a baitfish. Skirts come in a dazzling array of colors and patterns, allowing you to match local forage or create contrast for different water conditions. Some jigs have hand-tied skirts, offering a more premium, durable option.
- The Weed Guard: Most bass jigs designed for fishing in cover will have a fiber weed guard, or sometimes a single wire guard. This bristly collection of synthetic fibers protects the hook point from snagging on wood, rocks, or vegetation, allowing the jig to be fished in places other lures simply can't go. The stiffness of the weed guard can vary, and sometimes you might need to trim a few strands to get a better hook-set, especially if you're missing bites.
Why the Right Trailer is a Game Changer
The jig itself is only half the equation. The other, equally critical half, is the trailer. The trailer is the soft plastic bait you attach to the jig hook, and it dramatically influences the jig's profile, action, and overall presentation. Think of the jig as the chassis of a car, and the trailer as the engine and bodywork that gives it its unique performance and appeal.
Choosing the right trailer can mean the difference between getting bites and getting skunked. A bulky beaver-style bait might give you a slow fall and a big profile for dirty water, while a slender creature bait with flapping appendages might offer a faster fall and more subtle action in clear water. It's all about matching the hatch, imitating local forage, and adapting to the conditions you face, whether you're targeting smallmouth bass in the Best Rivers for Smallmouth Bass Fishing in Tennessee or largemouth in a reservoir.
Selecting the Perfect Jig and Trailer Combination
The sheer variety of jigs and trailers out there can feel overwhelming, like walking into a massive candy store. But once you understand the basic principles, making smart choices becomes second nature. It’s not about having every single option, but knowing which ones to grab for common scenarios you’ll encounter on Tennessee waters.
Matching Jig Type to Fishing Conditions
Different jigs are designed for different situations. Understanding these distinctions is key to getting your presentation right.
- Flipping Jigs: These jigs are typically compact, with a heavy weed guard and a strong, sharp hook. They're designed to be "flipped" or "pitched" into heavy cover like thick brush piles, lily pads, or flooded timber. Their streamlined profile allows them to penetrate cover with minimal snagging. You want something that falls quickly and cleanly through the canopy.
- Football Jigs: Characterized by their football-shaped head, these jigs are ideal for fishing on hard bottom, especially rocky ledges, points, and humps. The shape helps the jig "rock" over obstacles and reduces snags, all while keeping the hook pointed upwards. They're fantastic for dragging and hopping along the bottom, mimicking a crawfish.
- Swim Jigs: These jigs usually have a more hydrodynamic head shape, often with a pointed nose, and a lighter weed guard. They are meant to be retrieved steadily through the water column, much like a spinnerbait or a chatterbait. Their skirt pulsates, and when paired with the right trailer, they create an incredibly lifelike swimming action, perfect for covering water and targeting bass that are actively feeding on baitfish.
- Finesse Jigs: Lighter in weight and often with a smaller hook, finesse jigs are for when the bite gets tough, or when fishing in clear water with pressured bass. They offer a more subtle, natural presentation, often mimicking smaller crawfish or baitfish. These are great for light line applications and slow, methodical fishing.
- Arkie Jigs (Grass Jigs): This is a popular and versatile jig style, often featuring a flat-bottomed, bullet-shaped head. The Arkie head allows it to slide over wood and grass relatively well, making it a good all-around choice for a variety of cover types. It's a workhorse for many anglers and can be used for pitching, casting, and even light dragging.
Choosing the Right Trailer for Your Jig
This is where the real art comes in. The trailer should complement the jig, enhancing its action and appearance.
- Crawfish Imitations: When you want to mimic a crawfish, which is a staple in a bass's diet, especially for Tennessee Bass Fishing Seasons and Patterns, you'll go for creature baits or plastic craws. Brands like Strike King's Rage Craw or Zoom's Super Chunk are popular choices. These trailers add bulk, create a slow fall, and offer a natural, scuttling action. For a flipping jig in heavy cover, a compact craw trailer that doesn't flare out too much is ideal. For a football jig being dragged on the bottom, a bulkier craw with big claws provides a lot of displacement and visual appeal.
- Baitfish Imitations: For swim jigs, you’re often trying to imitate a swimming baitfish. Paddle tail swimbaits are the go-to here. The paddle tail creates a strong thumping action and realistic profile when retrieved. The Keitech Swing Impact Fat or a Yamamoto Zako are excellent examples. These trailers kick and wobble, making the entire jig-and-trailer combo look like a fleeing minnow. You might also use straight-tail grubs for a more subtle, darting action.
- Small Profile or Finesse Trailers: When fishing a finesse jig, you need a smaller, more subtle trailer. Small craws, chunk-style trailers, or even a small plastic worm can work wonders. The goal is a delicate presentation that doesn't overwhelm the fish. Sometimes, just a simple double-tail grub is all it takes to get bites when things are slow.
- Bulking Up/Slowing Down: If you want your jig to fall slower or have a larger profile, choose a bulkier, wider trailer. This increases water resistance and makes the jig "parachute" down. This is particularly effective in cold water when bass are sluggish, or in stained water where a larger profile helps fish find the lure.
- Slimming Down/Speeding Up: Conversely, if you need a faster fall or a smaller profile for clear water or fast-moving fish, opt for a slender, compact trailer. This reduces drag and allows the jig to plummet to the bottom quickly.
Here's a quick reference table for popular jig and trailer pairings:
| Jig Type | Common Weight Range | Ideal Trailer Types | Primary Application |
|---|---|---|---|
| Flipping Jig | 3/8 oz – 1.5 oz | Compact Craw, Beaver-style creature | Heavy cover (mats, brush, docks), punching vegetation |
| Football Jig | 1/2 oz – 1.5 oz | Full-sized Craw, Chunk, Swimbait | Deep structure (rocky ledges, points, humps), dragging bottom |
| Swim Jig | 1/4 oz – 1/2 oz | Paddle tail Swimbait, Grub | Covering water, sparse grass, open water, imitating baitfish |
| Finesse Jig | 1/8 oz – 1/4 oz | Small Craw, Chunk, Small Worm | Clear water, pressured fish, light line, subtle presentations |
| Arkie Jig | 1/4 oz – 3/4 oz | Craw, Chunk, Creature Bait | Versatile, general purpose, wood, rock, sparse grass |
Remember that this table offers general guidelines. Experimentation is always key! You might find a unique combination that bass in your local lake can't resist. For instance, sometimes a Best Lures for Pre-Spawn Bass Fishing can be a brightly colored jig and craw combination that stands out.
Rigging Your Jig for Success: Step-by-Step
Alright, you've picked out your jig and the perfect trailer. Now, let's get it rigged up correctly. This isn't just about getting it on the hook; it's about making sure it performs optimally in the water and maximizes your chances of a solid hook-set.
Attaching the Trailer Correctly
This is perhaps the most critical step in rigging a jig. A poorly rigged trailer will spin, look unnatural, and reduce your chances of a bite.
- Orient the Trailer: First, make sure you know which way your trailer is supposed to face. For most craws or creature baits, the claws or appendages typically face upwards or outwards to give the most realistic action. For paddle tails, the paddle should be oriented to create maximum thump when retrieved.
- Thread the Hook Eye: Take your jig and locate the hook eye. You want to insert the hook point of the jig directly through the center of the nose of your soft plastic trailer. Start just far enough back to penetrate a solid amount of plastic, usually about a quarter to a half-inch.
- Thread it Up the Shank: Gently push the trailer up the hook shank until the nose of the trailer is snug against the back of the jig head. You want it to be straight and flush, not crooked or gapping. This ensures the trailer is streamlined and moves naturally through the water. If the plastic is too soft, sometimes the jig collar can tear it, so be gentle.
- Secure with a Trailer Keeper (Optional but Recommended): Many jigs come with a small barb or wire keeper on the hook shank just behind the jig head. Once your trailer is pushed up, seat it firmly onto this keeper. This prevents the trailer from sliding down the hook during casting, retrieving, or after a missed strike. If your jig doesn't have a keeper, or if your trailer slides down easily, a tiny drop of super glue can secure it in place, especially useful if you're buying bulk trailers online from a store like Amazon and they don't have built-in attachment points.
- Check for Straightness: Hold the rigged jig up and visually inspect it. Is the trailer straight? Are the appendages aligned properly? A crooked trailer will cause unnatural action and potentially spook bass. Take an extra few seconds to get this right.
The Importance of a Good Knot
Once your jig and trailer are perfectly aligned, you need to tie it to your fishing line. A strong, reliable knot is non-negotiable.
- Palomar Knot: This is an incredibly strong and popular knot for tying jigs and other lures. It's relatively easy to tie, even in low light, and maintains much of your line's breaking strength. It's my go-to for jig fishing because of its reliability.
- Improved Clinch Knot: Another excellent option, the improved clinch is also very strong and a classic for many types of lures. Just make sure to make enough turns (5-7 for mono/fluoro, less for braid) and moisten the line before tightening.
No matter which knot you choose, always make sure it's cinched down tightly and trim any excess tag line closely. Loose knots are a common reason for lost fish.
Line Selection for Jig Fishing
The type of fishing line you use will greatly impact your sensitivity, casting distance, and ability to handle cover.
- Fluorocarbon Line: This is often considered the gold standard for jig fishing. Fluorocarbon is nearly invisible underwater, extremely sensitive, and has low stretch, which helps you feel subtle bites and get solid hook-sets. It also sinks, which can be an advantage when you want your jig to get down quickly. Lines in the 12-20 lb test range are common.
- Braided Line: Braid offers incredible strength and zero stretch, providing maximum sensitivity and the ability to cut through vegetation. This makes it a fantastic choice for flipping and pitching jigs into heavy cover, where you need to muscle fish out quickly. However, it's highly visible, so many anglers will tie a fluorocarbon leader (10-20 feet) to their braided mainline. This gives you the best of both worlds: strength and sensitivity with a stealthy presentation.
- Monofilament Line: While less common for dedicated jig fishing due to its stretch and visibility, monofilament can still be used, especially in dirtier water or when fishing in areas with minimal cover. Its buoyancy can also be a benefit for slower, more subtle presentations in shallow water.
Your line choice will often depend on the specific conditions, the type of jig you're using, and the cover you're fishing. For heavy cover applications, a solid braided line or a stout fluorocarbon is often preferred, similar to what you might use when learning How to Fish a Texas Rig for Bass.
Mastering Jig Presentation and Retrieve
Rigging your jig perfectly is only half the battle. The other half is presenting it in a way that entices strikes. This is where you bring the lure to life, mimicking natural forage. Whether you're fishing a Watts Bar Lake Bass and Catfish Species spot or a clear mountain stream, the way you work your jig can be a game-changer.
Different Retrieves for Different Jigs
Each jig type has preferred ways it likes to be fished to maximize its effectiveness.
- Flipping and Pitching Jigs: For these, the technique is all about precision and stealth. You're usually targeting specific pieces of cover. The cast itself should be a quiet entry into the water, followed by letting the jig fall vertically on a semi-slack line. As it falls, pay close attention, as many bites happen on the initial drop. Once it hits bottom, you can hop it, drag it, or shake it in place. A few short hops, then let it sit. Often, the bass will pick it up when it's stationary. Retrieve slowly, feeling every bump and tick.
- Football Jig Dragging and Hopping: These jigs are designed to be fished on the bottom. Cast it out, let it sink, then slowly drag it across the bottom using your rod tip, reeling in slack as you go. Imagine a crawfish scuttling. You can also "hop" it by lifting your rod tip sharply a foot or two, letting the jig jump off the bottom, and then fall back down on a semi-slack line. Most bites will occur as the jig falls. This is a deadly technique on rocky points and ledges, especially when bass are looking for crawfish.
- Swim Jig Retrieves: With a swim jig, you're trying to imitate a baitfish. Cast it out and start a steady retrieve, much like you would a spinnerbait. Experiment with retrieve speeds – sometimes a slow, steady pull is best, other times a faster burn will trigger a reaction strike. You can also add subtle twitches with your rod tip to give it an erratic, wounded baitfish action. This is a great lure for covering water and finding active bass, particularly in areas with scattered grass or submerged timber.
- Finesse Jig Shaking and Dragging: Finesse jigs demand a subtle approach. Cast them out, let them sink to the bottom, and then either shake them gently in place or drag them very slowly. Think about imitating a small, timid crawfish or a stunned baitfish. The goal is to provide just enough action to draw attention without overpowering the fish with a too-aggressive presentation. This technique shines in clear, cold, or highly pressured waters.
Reading Your Line and Feeling the Bite
One of the biggest challenges with jig fishing, especially for beginners, is identifying a bite. Bass don't always yank your rod down. Often, it's a subtle "tick," a spongy feeling, or your line just starts moving sideways.
- The "Tick": This is the classic jig bite. You'll feel a distinct, sharp "tick" or "thump" on your line. When you feel this, drop your rod tip slightly, reel in any slack, and set the hook hard.
- Spongy Weight: Sometimes, instead of a distinct tick, you'll feel a sudden heaviness or "spongy" resistance when you try to move your jig. It might feel like you've snagged a piece of moss. This is often a bass mouthing the jig. Set the hook!
- Line Movement: Keep an eagle eye on your fishing line where it enters the water. If it suddenly jumps, twitches, or starts moving sideways, that's almost certainly a bass. Even if you don't feel anything, set the hook immediately. This is especially crucial when fishing on a slack line, as is often the case when letting a jig fall.
Feeling these subtle bites takes practice, but the more you fish jigs, the more attuned you’ll become to what a bite feels like. Using a sensitive rod (like one of the Best Rods for Largemouth Bass) and low-stretch line (fluorocarbon or braid) will significantly enhance your ability to detect these subtle takes.
Seasonal Considerations for Jig Fishing
The time of year and water temperature play a huge role in how bass behave and where they hold, which in turn influences your jig selection and presentation.
- Spring: During the pre-spawn and spawn, bass are often shallow and aggressive. Flipping jigs into heavy cover near spawning flats is incredibly effective. They'll readily attack jigs mimicking crawfish guarding their beds. A good example is fishing around the banks of Percy Priest Lake Fishing Near Nashville, Tennessee during this time.
- Summer: As temperatures rise, bass often retreat to deeper, cooler waters or seek dense overhead cover to ambush prey. Football jigs shine on deep ledges and points, while flipping jigs are still potent for punching through thick mats of vegetation or around docks. Early mornings and late evenings can also bring them shallow for swim jigs.
- Fall: Bass become highly active in the fall, feeding up for winter. They often follow baitfish into shallower creeks and pockets. Swim jigs can be incredibly effective for covering water and mimicking those baitfish. Football jigs can still pick off fish on main lake points and humps.
- Winter: Cold water slows bass down. They tend to school up and hold tight to deep structure. Finesse jigs or slow-dragged football jigs become the primary weapons. Your retrieve should be agonizingly slow, often just barely moving the jig. Sensitivity is key, as bites will be very subtle. If you're looking for more general strategies, our Winter Bass Fishing Techniques guide has further insights.
Understanding these seasonal patterns will help you choose not just how to rig your jig, but when and where to fish it for maximum success. Don't be afraid to change jig colors and trailer styles based on water clarity and the predominant forage. Sometimes a subtle tweak, like switching from a bulky craw to a slimmer beaver, is all it takes to trigger a strike.
Advanced Tips and Troubleshooting for Jig Anglers
Once you've got the basics down, there's always room to refine your jig game. A few extra tricks can make a big difference, especially when fishing pressured waters. Just like with any other technique, the more details you master, the more consistent your results will be.
Customizing Your Jig and Trailer
You don't always have to use a jig right out of the package. Customization is a huge part of jig fishing.
- Skirt Trimming: If you want a more compact profile or a faster fall, trim some of the skirt strands. For a bulkier look, you might leave the skirt long. Sometimes, trimming just a few strands from the bottom of the skirt can give it a more flared, lifelike appearance as it falls.
- Trailer Modification: Don't be afraid to trim your soft plastic trailers. Shorten a craw's claws, or even snip off a paddle tail to create a different action. Some anglers will dip the tips of their trailer claws in a contrasting dye, like chartreuse or orange, to add a "pop" of color that mimics a defensive crawfish.
- Rattles: Many anglers add small jig rattles to their trailers. These slide onto the hook shank or can be inserted into the plastic, creating additional noise and vibration. This can be especially effective in stained or dirty water, helping bass locate your lure by sound. You can find these add-ons readily on platforms like Amazon.
- Scent: Applying bass scent to your jig trailer can encourage fish to hold onto the bait longer, giving you more time to detect the bite and set the hook. This is a small detail that can sometimes make a big difference, especially in tough conditions.
Overcoming Common Jig Fishing Challenges
Every angler faces challenges, and jig fishing is no exception. Here are a few common issues and how to tackle them:
- Snags: Jigs are designed for cover, but they can still get snagged. If you feel a snag, don't just pull harder. Give your line slack, then pop your rod tip sharply. Sometimes, this frees the jig. If that doesn't work, point your rod tip directly at the snag, keeping tension, and try to bow string your line, letting it snap back. This can often dislodge the jig. If you're fishing areas known for snags, consider using a weedless hook, even on a jig that already has a weed guard, for extra protection.
- Missed Hook-Sets: If you're feeling bites but not hooking up, several things could be at play.
- Dull Hook: Check your hook point! A dull hook won't penetrate. Carry a hook sharpener and touch it up regularly.
- Too Much Weed Guard: If your jig's weed guard is too stiff or too dense, it might be preventing the hook point from exposing itself during a bite. Trim a few strands at a time until you find the sweet spot between weedless and good hook penetration.
- Trailer Interference: Make sure your trailer isn't interfering with the hook gap. Sometimes, a bulky trailer can cover too much of the hook. If this is the case, try a smaller or slimmer trailer.
- Setting Too Soon/Too Late: It takes practice to know when to set the hook. Sometimes, waiting a split second longer after feeling the initial tick can allow the bass to fully engulf the jig. Other times, a quick reaction is needed.
- Fish Not Biting: If bass aren't biting your jig, it might be time to change something up.
- Color: Try a different color. If you're using a dark jig in clear water, switch to a more natural green pumpkin or brown. In stained water, a black and blue or junebug jig can be very effective.
- Weight: Go lighter for a slower, more subtle fall, or heavier to get down faster and maintain bottom contact in wind or current.
- Trailer: Change your trailer. A different profile, action, or size can often make the difference.
- Retrieve: Speed up, slow down, add more pauses, or increase your hops. Experiment until you find what triggers a strike. Sometimes, even the smallest change can turn a slow day around, which is a common theme whether you're learning How to Fish for Bass in Summer Heat or cold weather.
Jig fishing is a journey, not a destination. There's always something new to learn, a different way to rig, or a subtle nuance to master. The key is to pay attention to details, adapt to conditions, and always be willing to experiment. With these rigging tips and techniques, you'll be well on your way to becoming a more effective and confident jig angler on any Tennessee fishing adventure.
Disclaimer
Fishing involves inherent risks, and conditions can change rapidly. Always prioritize safety, wear appropriate personal flotation devices, and be aware of your surroundings. Regulations, seasons, and limits can vary; always check the latest Tennessee Wildlife Resources Agency (TWRA) guidelines before fishing. This guide provides general information and should not replace official sources or professional advice.